Showing posts with label {chocolate}. Show all posts

Monday, April 25, 2011

Baby O's Mickey Mouse-Themed 2nd Birthday Cake

This is what has been occupying whatever left of my time and energy over the past few weeks...
The good side of the Mickey Mouse cake
And the whole thing which took hours and days to set up, was all over in just a few minutes!

This is a chocolate sponge cake layered with fresh whipped cream and sliced strawberries decorated with fondant. My very first fondant covered cake. An unsuccessful one that is! I underestimated the time and skill required to just roll out the light blue fondant and cover the cake! On top of that, the whipped cream didn't set hard enough and the humid weather here in Penang just took the opportunity to melt the fondant on the cake before we could cut it.

I actually started molding the Mickey and Minnie figurines less than a week before the party. I had initially wanted to just buy the figurines off eBay or the toy store. A lot of eBay sellers don't ship to this part of the world (sigh!) and the toy stores don't seem to stock just Mickey and friends figurines in their original attire! Seriously didn't know that before! So I ran out of time and decided to just mold the figurines. Only Mickey and Minnie instead of all the characters from the Mickey Mouse Clubhouse - Donald, Daisy, Goofy and Pluto as I was already short of time and didn't want to challenge myself further. So using a piece of cut plastic straw, I managed to mold Mickey's head which probably was the hardest bit. Was quite pleased with the result although dear hubby calls him Mickey's cousin!

Mickey or Mickey's cousin?
Replicated the procedure and made Minnie. Then added the body, legs, shoes and arms.
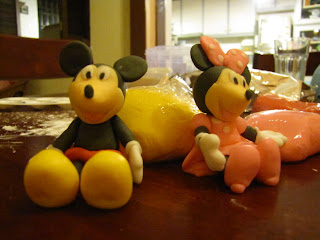
The only close-up picture of the two that I took of the couple
I actually molded the Mickey Park arch, a 2D Clubhouse, stars on skewers with Baby O's name on it and other bits and bobs the following nights. Unfortunately, I now realised I have not taken a photo of them! 

The night before the party, I baked the chocolate sponge cake. I took the recipe from a friend's friend's blog. Someone I know who bakes a lot and have very successful bakes. She referred us to Kitchen Corner's fool-proof chocolate sponge cake. I only understood part of the instructions on the video but found it really helpful to see how the texture should be after each procedure! Will write what I did in another post when I find the time (and energy). Anyway, if the cake had failed, I would have gone to Secret Recipe the next day, buy a cake and just put the figurines on it!

On the morning of the party itself, I  whipped about 500ml whipping cream with a tablespoon of icing sugar and a teaspoon of vanilla till it is stiff and used it to layer the cake with some sliced strawberries. Then covered the whole cake with whipped cream and dunk it in the fridge to set. The layers added height to the cake which I was really glad!
Love the colour contrast

While setting, I rolled out the fondant, and rolled out again as there were cracks, then rolled out again as the size wasn't big enough, and rolled out again cause some other thing happened..... When I finally got the fondant rolled out nicely, and was putting it on the cake, the fondant split. Well, like I said, I took very much longer than anticipated and was late to go and set up the place with not long till the guests arrive. Yikes! So I gave up and just left the back as it is, all patched up... 
Oh! No! Dear me, dear me!
At least the front was decent enough...
Mickey Mouse Clubhouse

Then it was off to the party venue and to finish assembling the rest of the items there.


The melted cake...
Anyway, the cake wasn't the highlight of the event of course but I had a lot of fun putting it together. It was something different for me to do to occupy my time. It was almost therapeutic and I certainly look forward to doing things like these though glad that the party is over and I can rest now!

Thursday, November 25, 2010

Baking Chocolate Chip Cookies with Baby O

Recently, I bought Hershey’s Cocoa Powder and Hershey's Chocolate Chips to bake Martha Stewart’s Cream Cheese Brownie. Attached to the products is a mini Hershey’s recipe book with all sorts of chocolate goodies. So I decided to try the chocolate chip cookies recipe with Baby O as our little activity today.

Baking is such a great activity with toddlers. It is one of the activities that stimulates all senses! The child is able to see all the action and ingredients and tools, hear the clanging and noises spoons knocking on bowls, touch the different textures of the butter or cookie dough, smell the aroma of the cookies baking in the oven and finally taste it! Yum yum! On top of that, baking also develops language. During the activity, words like big, small, round, brown, crumbs, mix, fast, slow, and uh oh! (very often) can be related to relevantly. Have I mentioned that it is also therapeutic for the parent?


For parents who would like to conduct this baking business with their young ones, I recommend you to:

1. use a simple recipe with not too many ingredients - it will be a handful minding a toddler and trying to get everything together. You wouldn’t want yourself of your toddler getting frustrated so keep complicated recipes for yourself another time. Chocolate chip cookies is a good start.

2. bake something that the little one can enjoy later too - after all, he/ she did help out. It is only fair for him/ her to enjoy the fruit of his/ her labour! So go for something light or reduce the amount of sugar or omit the salt and use unsalted butter. You might even want to substitute chocolate chips with raisins.

3. expect mess, maybe loads of them - use a clear space and prep toddler with apron/ bibs/ clothes you don’t mind staining.

4. keep the communication going - this might be one of the most important step for the activity. Explain the steps while measuring, mixing, etc. Tell him/ her how the scale or oven or mixer works. Show him/ her how you crack an egg.

5. use a low surface - we prepared our cookie dough on an IKEA Lack side table which is at the right height for Baby O to participate and see all that is going on. If you don’t have a suitable low table, another suggestion is to prop your child on his/ her highchair while you prepare on a surface next to him/ her.

6. clean up together - don’t expect your toddler to wash the mixing bowls but you can always wipe the surfaces, put things away and wash your hands together to instill the responsibility.

7. take it easy - you’re not going to make a living out of this so just enjoy the process (and the cookies) together!

Note: Baby O is 19 months old at the time of this post. You can also start baking with babies. That's right! Sling them on you or put them on their high chair and dictate all the steps that you are going through to promote language development. It's never too early!

Saturday, November 13, 2010

Martha Stewart’s Cream Cheese Brownies

I have been eyeing this recipe for the longest time and finally got to satisfy my craving this afternoon! A uni-flatmate used to bake a similar cream cheese brownie those days and I have always wished she had baked more or more often. Recently, the taste of this cream cheese brownie just surfaced in my mind and I managed to get this recipe from Martha Stewart’s site (♥ it!) which I hope will not disappoint. Lo and behold, this easy to make cream cheese brownie was a slice of my heaven on earth!

Martha Stewart’s Cream Cheese Brownies is a must try! I made a few adjustments to it though mainly reducing the amount of sugar. I was glad that I did. Otherwise, I would have been eating chocolate sugar! Anyway, this is what I did:

Note 1: As most of my ingredients are stored in the fridge, I took out the 4 eggs, measured 145g [SCS unsalted] butter and 115g cream cheese to get them to room temperature before moving onto other steps.

Note 2:Since this is my first attempt, I started by preparing the baking pan (recommended 9-inch square) by brushing it with butter and lining the bottom and sides with parchment paper. Leave more paper overhanging on the sides so it is easier to lift the brownies out later. Set it aside. Then I preheated the oven to 180C instead of usually doing it first knowing that I will be taking more time to get everything ready.

Note 3:If you need help to convert the units, Online-Unit-Converter.com is a pretty good place to go to.

1.     Boil some water in a saucepan and switch of the heat. Place 115g unsalted butter and 227g semisweet or bittersweet (chopped) chocolate in a large heat-proof bowl and set over the saucepan to allow butter and chocolate to melt (2-3 minutes). Remove butter & chocolate bowl from pan. Add 1 cup sugar; mix to combine. Add 3 eggs, and mix to combine. Set aside.

2.        In a small bowl, whisk 1 cup flour, 1/4 cup unsweetened cocoa powder, 1/2 teaspoon baking powder, and 1/2 teaspoon salt; set aside.

3.        Prepare cream-cheese mixture: Whisk 115g cream cheese with 30g room-temperature butter. Whisk in 1/8 cup sugar, 1 egg, and 2 tablespoons all-purpose flour.

4.        Add flour and cocoa mixture (step 2) into melted chocolate (step 1). Mix just until moistened (do not overmix).

5.        Alternately spoon chocolate batter and cream-cheese mixture into pan. Swirl mixture (if necessary) with a skewer stick to marble.

6.        Bake for 60 minutes until a toothpick inserted in center comes out with a few moist crumbs attached. Cool in pan for 30 minutes. Using paper overhang, lift brownies out of pan; transfer to a rack to cool completely (still on paper). --> Don’t get this part of the instructions. Who can wait that long?! Anyway, I couldn’t and rewarded myself after removing it out from the pan!

7.     Perfect served warm on its own or with a glass of milk or a scoop of Haagen Daaz strawberry ice-cream (or Belgium chocolate if you don’t mind being overdosed. Ooh la la!)

8.        To store, cut completely cooled brownies with a dampened serrated knife into squares on a cutting board before storing in an airtight container at room temperature, up to 2 days.


Note: This is not the original Martha Stewart’s Cream Cheese Brownies recipe. It you would like the original Martha Stewart’s Cream Cheese Brownies recipe, click here.

Wednesday, November 3, 2010

This Mama's Chocolate List

It’s the rainy season and it has been forecasted to rain lots here in Penang. The perfect time for a cup of hot chocolate! I mentioned before somewhere in this blog that I discovered recently that I actually like chocolate more than I know. Let’s see, there’s:


This Mama's mini chocolate cupcakes
hot chocolate
moist chocolate cake
brownies
Haagen-Daaz Belgium chocolate ice-cream
Cote D’Or dark chocolate
Pocky Almond chocolate coated biscuit sticks
Lotte chocolate filled biscuits
chocolate eclairs


Hmm... not that bad.. doesn’t look like I live on chocolate yet!

Thursday, September 16, 2010

Chocolat Chaud

Dear hubby wanted to pay a visit to the Coffee Bean & Tea Leaf Gurney Hotel, Penang branch along Gurney Drive after dinner last night. Since it was late and I didn’t want to lay in bed with eyes wide open, I ordered a cup of Hot Double Chocolate (with marshmallows) instead. It has been ages since I last had a cuppa yummy hot chocolate (with marshmallows!). Ahh... divine.....

I think I realised last night that I actually love chocolate. Not just any chocolates, but good, dark, rich chocolate. That’s why I also went for the chocolate cake at the cake counter. Yikes! And earlier, I was looking at all these chocolate cake recipes online!! Hmm...

Anyway, I bought a 454g tin of CBTL’s Special Dutch Chocolate Powder since it is now on offer at RM36 instead of RM45. I can make quite a lot of cups with this tin vs having them in the shop!
And the best part of it:

Hmm... time for another cup??
Related Posts with Thumbnails