Showing posts with label {baking}. Show all posts

Monday, April 25, 2011

Baby O's Mickey Mouse-Themed 2nd Birthday Cake

This is what has been occupying whatever left of my time and energy over the past few weeks...
The good side of the Mickey Mouse cake
And the whole thing which took hours and days to set up, was all over in just a few minutes!

This is a chocolate sponge cake layered with fresh whipped cream and sliced strawberries decorated with fondant. My very first fondant covered cake. An unsuccessful one that is! I underestimated the time and skill required to just roll out the light blue fondant and cover the cake! On top of that, the whipped cream didn't set hard enough and the humid weather here in Penang just took the opportunity to melt the fondant on the cake before we could cut it.

I actually started molding the Mickey and Minnie figurines less than a week before the party. I had initially wanted to just buy the figurines off eBay or the toy store. A lot of eBay sellers don't ship to this part of the world (sigh!) and the toy stores don't seem to stock just Mickey and friends figurines in their original attire! Seriously didn't know that before! So I ran out of time and decided to just mold the figurines. Only Mickey and Minnie instead of all the characters from the Mickey Mouse Clubhouse - Donald, Daisy, Goofy and Pluto as I was already short of time and didn't want to challenge myself further. So using a piece of cut plastic straw, I managed to mold Mickey's head which probably was the hardest bit. Was quite pleased with the result although dear hubby calls him Mickey's cousin!

Mickey or Mickey's cousin?
Replicated the procedure and made Minnie. Then added the body, legs, shoes and arms.
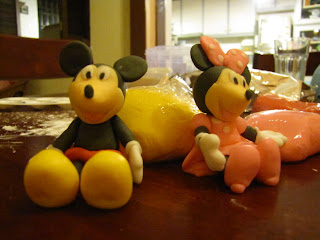
The only close-up picture of the two that I took of the couple
I actually molded the Mickey Park arch, a 2D Clubhouse, stars on skewers with Baby O's name on it and other bits and bobs the following nights. Unfortunately, I now realised I have not taken a photo of them! 

The night before the party, I baked the chocolate sponge cake. I took the recipe from a friend's friend's blog. Someone I know who bakes a lot and have very successful bakes. She referred us to Kitchen Corner's fool-proof chocolate sponge cake. I only understood part of the instructions on the video but found it really helpful to see how the texture should be after each procedure! Will write what I did in another post when I find the time (and energy). Anyway, if the cake had failed, I would have gone to Secret Recipe the next day, buy a cake and just put the figurines on it!

On the morning of the party itself, I  whipped about 500ml whipping cream with a tablespoon of icing sugar and a teaspoon of vanilla till it is stiff and used it to layer the cake with some sliced strawberries. Then covered the whole cake with whipped cream and dunk it in the fridge to set. The layers added height to the cake which I was really glad!
Love the colour contrast

While setting, I rolled out the fondant, and rolled out again as there were cracks, then rolled out again as the size wasn't big enough, and rolled out again cause some other thing happened..... When I finally got the fondant rolled out nicely, and was putting it on the cake, the fondant split. Well, like I said, I took very much longer than anticipated and was late to go and set up the place with not long till the guests arrive. Yikes! So I gave up and just left the back as it is, all patched up... 
Oh! No! Dear me, dear me!
At least the front was decent enough...
Mickey Mouse Clubhouse

Then it was off to the party venue and to finish assembling the rest of the items there.


The melted cake...
Anyway, the cake wasn't the highlight of the event of course but I had a lot of fun putting it together. It was something different for me to do to occupy my time. It was almost therapeutic and I certainly look forward to doing things like these though glad that the party is over and I can rest now!

Saturday, January 22, 2011

Almond Thin Cookies Take Two!

This is it! Much better! Much yummier!!! Well, I'm satisfied... Probably still not good enough to sell yet but it's good enough for me, myself and dear hubby! My, these things are super addictive!! We can munch up a whole bunch in one sitting!

As mentioned in my first attempt post, the cookies were too thick so I divided the batter to three this time and tried my best to spread it out as thinly as possible on the greaseproof paper which I fold at the sides to mark as guides so I don't go out of line. I also reduced the amount of sugar to 3/4 cups. I only managed to use about 150g almond flakes instead of the 340g suggested in the original recipe. This time I obtained 9 dozens compared to just 4 previously as I cut them into smaller bite size pieces (that's how they became addictive!)

So this time its:
227g SCS butter; unsalted
1 large egg
3/4 cup white sugar
1 3/4 cups all-purpose flour
1 teaspoon vanilla extract

1 teaspoon salt

150g almonds flakes
Whites of 1 egg (for glazing)

Shall let the pictures do the talking:

Spread batter out thinly
Sprinkle then press almond flakes down firmly
After baking for 12 minutes
Glaze with egg white then cut with sharp knife


Back into the oven for another 5 minutes
Cooling on wire racks before being eaten!

Sunday, January 9, 2011

Almond Thin Cookies

Every Chinese New Year, I look forward to a few yummy goodies usually only available around this festive season. Almond thin cookies is one of them. However, due to the price increase in things like sugar etc., we consumers have to pay more for our Chinese New Year goodies including my favourite almond thin cookies! A small container of these cookies were seen on sale by the road side for RM17! And each 1-inch square cookie only had two miserable almond flakes on them. So I decided to try and make them myself. I found a few sites online but this {one} looks closest to what I am craving for though not quite there. The author did give a warning in her title (Not-So-Thin Almonds!). I gave it a try anyway.


This is what I used:

227g SCS butter; unsalted
1 large egg
Less than 1 cup white sugar (I reduced about 1 large tablespoon)

1 3/4 cups all-purpose flour
1 teaspoon vanilla extract

1 teaspoon salt

100g almonds flakes (original recipe calls for 2 cups or 340g but when spread out, I only managed to use about 100g)
Whites of 1 egg (for glazing)


This is what I did (copied directly from {site} with minor adjustments):
    •    Preheat oven to 160 degrees C.
    •    Cream the butter and sugar until light and fluffy. Add the egg and vanilla and beat until smooth.
    •    Sift together the flour and salt and slowly add to butter mixture. Mix until just blended.
    •    Divide batter in half and place each half on in the centre of two greaseproof paper.
    •    Dip a spatula in warm water and spread batter to cover the entire baking sheet, making sure batter is spread evenly. Lay a thin layer of almond flakes and press gently into dough.
    •    Bake each sheet about 12 minutes, or until edges are lightly browned. Remove from oven.
    •    Cut hot cookies into neat 2-inch squares. Glaze cookies generously but gently to prevent displacing almond flakes in the process. Return to oven and bake until lightly golden, about 5 minutes. Watch carefully to prevent over-baking.
    •    Remove from oven to a wire rack. Slide spatula under cookies to loosen. Cool completely on cookie sheets. Store in airtight containers with layers of wax paper between layers


This is the result:
Also not as thin as I would like them but with enough almond flakes for each bite!

This is what I encountered:
I had a problem spreading the batter evenly and thinly on the baking sheet. So the thicker parts of the batter were still soft inside. This is also why I only managed to make 4 dozen cookies instead of 6 as per original recipe.

I find that the cookies were still too sweet even though I had reduced the amount of sugar. Otherwise, it would have been almost perfect!

Another problem is cutting them without displacing the almond flakes. The almond flakes just didn’t stick even though I pressed them down firmly before baking.


This is what I will do next time:
There must be a way to get the batter spread out evenly and thinly. Place another greaseproof paper on top and roll out using skewers at the side as guide to thickness perhaps? Divide batter into three instead of only two? Mine is only a small oven anyway. (Can't wait to get a proper built-in oven!)

Try with only 3/4 cup sugar next time. 

Try baking with a layer of egg white glaze first before cutting as another measure to get the almond flakes to stick to the cookie besides pressing them down firmly.


This is what it costs:
SCS Unsalted Butter RM8
Prai Sugar RM0.50
1 Egg RM0.50
Flour RM0.50
Almond RM4
Vanilla Extract RM0.10
TOTAL: RM13.60 for 4 dozen cookies
Hidden costs - electricity, labour, time.

This is small scale, homemade, with good quality ingredients. Imagine using big cans of cheap margarine etc..


Will definitely make more soon! Hopefully can get some decent ones out for Chinese New Year!

{check out second attempt: Almond Thin Cookies Take Two!}

Thursday, November 25, 2010

Baking Chocolate Chip Cookies with Baby O

Recently, I bought Hershey’s Cocoa Powder and Hershey's Chocolate Chips to bake Martha Stewart’s Cream Cheese Brownie. Attached to the products is a mini Hershey’s recipe book with all sorts of chocolate goodies. So I decided to try the chocolate chip cookies recipe with Baby O as our little activity today.

Baking is such a great activity with toddlers. It is one of the activities that stimulates all senses! The child is able to see all the action and ingredients and tools, hear the clanging and noises spoons knocking on bowls, touch the different textures of the butter or cookie dough, smell the aroma of the cookies baking in the oven and finally taste it! Yum yum! On top of that, baking also develops language. During the activity, words like big, small, round, brown, crumbs, mix, fast, slow, and uh oh! (very often) can be related to relevantly. Have I mentioned that it is also therapeutic for the parent?


For parents who would like to conduct this baking business with their young ones, I recommend you to:

1. use a simple recipe with not too many ingredients - it will be a handful minding a toddler and trying to get everything together. You wouldn’t want yourself of your toddler getting frustrated so keep complicated recipes for yourself another time. Chocolate chip cookies is a good start.

2. bake something that the little one can enjoy later too - after all, he/ she did help out. It is only fair for him/ her to enjoy the fruit of his/ her labour! So go for something light or reduce the amount of sugar or omit the salt and use unsalted butter. You might even want to substitute chocolate chips with raisins.

3. expect mess, maybe loads of them - use a clear space and prep toddler with apron/ bibs/ clothes you don’t mind staining.

4. keep the communication going - this might be one of the most important step for the activity. Explain the steps while measuring, mixing, etc. Tell him/ her how the scale or oven or mixer works. Show him/ her how you crack an egg.

5. use a low surface - we prepared our cookie dough on an IKEA Lack side table which is at the right height for Baby O to participate and see all that is going on. If you don’t have a suitable low table, another suggestion is to prop your child on his/ her highchair while you prepare on a surface next to him/ her.

6. clean up together - don’t expect your toddler to wash the mixing bowls but you can always wipe the surfaces, put things away and wash your hands together to instill the responsibility.

7. take it easy - you’re not going to make a living out of this so just enjoy the process (and the cookies) together!

Note: Baby O is 19 months old at the time of this post. You can also start baking with babies. That's right! Sling them on you or put them on their high chair and dictate all the steps that you are going through to promote language development. It's never too early!

Saturday, November 13, 2010

Martha Stewart’s Cream Cheese Brownies

I have been eyeing this recipe for the longest time and finally got to satisfy my craving this afternoon! A uni-flatmate used to bake a similar cream cheese brownie those days and I have always wished she had baked more or more often. Recently, the taste of this cream cheese brownie just surfaced in my mind and I managed to get this recipe from Martha Stewart’s site (♥ it!) which I hope will not disappoint. Lo and behold, this easy to make cream cheese brownie was a slice of my heaven on earth!

Martha Stewart’s Cream Cheese Brownies is a must try! I made a few adjustments to it though mainly reducing the amount of sugar. I was glad that I did. Otherwise, I would have been eating chocolate sugar! Anyway, this is what I did:

Note 1: As most of my ingredients are stored in the fridge, I took out the 4 eggs, measured 145g [SCS unsalted] butter and 115g cream cheese to get them to room temperature before moving onto other steps.

Note 2:Since this is my first attempt, I started by preparing the baking pan (recommended 9-inch square) by brushing it with butter and lining the bottom and sides with parchment paper. Leave more paper overhanging on the sides so it is easier to lift the brownies out later. Set it aside. Then I preheated the oven to 180C instead of usually doing it first knowing that I will be taking more time to get everything ready.

Note 3:If you need help to convert the units, Online-Unit-Converter.com is a pretty good place to go to.

1.     Boil some water in a saucepan and switch of the heat. Place 115g unsalted butter and 227g semisweet or bittersweet (chopped) chocolate in a large heat-proof bowl and set over the saucepan to allow butter and chocolate to melt (2-3 minutes). Remove butter & chocolate bowl from pan. Add 1 cup sugar; mix to combine. Add 3 eggs, and mix to combine. Set aside.

2.        In a small bowl, whisk 1 cup flour, 1/4 cup unsweetened cocoa powder, 1/2 teaspoon baking powder, and 1/2 teaspoon salt; set aside.

3.        Prepare cream-cheese mixture: Whisk 115g cream cheese with 30g room-temperature butter. Whisk in 1/8 cup sugar, 1 egg, and 2 tablespoons all-purpose flour.

4.        Add flour and cocoa mixture (step 2) into melted chocolate (step 1). Mix just until moistened (do not overmix).

5.        Alternately spoon chocolate batter and cream-cheese mixture into pan. Swirl mixture (if necessary) with a skewer stick to marble.

6.        Bake for 60 minutes until a toothpick inserted in center comes out with a few moist crumbs attached. Cool in pan for 30 minutes. Using paper overhang, lift brownies out of pan; transfer to a rack to cool completely (still on paper). --> Don’t get this part of the instructions. Who can wait that long?! Anyway, I couldn’t and rewarded myself after removing it out from the pan!

7.     Perfect served warm on its own or with a glass of milk or a scoop of Haagen Daaz strawberry ice-cream (or Belgium chocolate if you don’t mind being overdosed. Ooh la la!)

8.        To store, cut completely cooled brownies with a dampened serrated knife into squares on a cutting board before storing in an airtight container at room temperature, up to 2 days.


Note: This is not the original Martha Stewart’s Cream Cheese Brownies recipe. It you would like the original Martha Stewart’s Cream Cheese Brownies recipe, click here.

Friday, November 12, 2010

Cheesy Pasta Bake

Takes only minutes to prepare especially on days like today when I absolutely don’t feel like cooking but I can’t leave my Baby O starving. This Cheesy Pasta Bake is such a random thing which is the best part of it! You can add or take out whatever ingredient you like.

This is what I did:

Boil a handful of pasta shapes according to instructions on pack.

While pasta is boiling, grate a handful of carrots into a baking bowl.

Chop a tiny clove of garlic finely and place into bowl. (Will omit next time as Baby O didn’t like the raw taste of it.)

Add half a teaspoon of mustard and crack some black pepper into bowl.

Score the bottom of a small tomato and place into boiling pasta.

Pour a handful of frozen garden peas into boiling pasta.

Roughly chop two baby corn and place into boiling water.

Switch heat off and remove tomato. Rinse with tap water and peel skin off before chopping roughly and add into bowl.

Drain pasta, peas and corn and mix all ingredients together in bowl.

Grate as much or as little cheddar cheese on top before baking in an oven toaster (or a preheated oven) for about 5 minutes and we have a little bowl of Cheesy Pasta Bake packed with red, orange, yellow, and green goodies topped up with calcium!

Other alternative ingredients: tuna/ salmon flakes, lightly sauteed onions, broccoli, cauliflower... basically whatever you can think of or available in your larder. You can also cook a tablespoon of flour in about a teaspoon of butter in a pan and then add a small cup of milk and bring to boil together with the grated cheese before baking it the proper way.

Lunch sorted.

This Mama would really like to know: Do you have any other lazy-day meal suggestions to share?

Thursday, September 16, 2010

Rachel Allen’s Lemon Cupcakes

Found out that it was a friend’s birthday yesterday. That meant opportunity to bake! What was next on the list? Rachel Allen’s Lemon Cupcakes of course! Inspired after watching her programme on AFC. Since the Madeira Marbled Cake was a success, the Lemon Cupcake should be good too!

The recipe I found online says this yields a dozen cupcakes. To my dismay, there was just enough batter for eight cupcakes! Even then, I had to scrape every single last bit out for that eight! So, instead of giving nine to our friend, I had to cut it down to just six and the balance two for ourselves.

The cupcakes were for a guy. I didn’t wanted to just present the cupcakes with just lemon buttercream spread on top as it may seem too feminine. So I incorporated a simple, fondant design and this was the result!
Wished the chocolate was of a darker shade but it was getting late...

Oh, and the Lemon Cupcakes tasted light and lemony but I would go for the Madeira Marbled Cake anytime! 

p.s. I also read a tip earlier - make a hole in the middle of the batter in the case to prevent cakes from cracking at the centre like mine here.

Saturday, September 11, 2010

Rachel Allen’s Marbled Madeira Cake

I was watching a bit of tv yesterday and have fallen in love with Rachel Allen! She makes baking seem like a breeze and explains everything so simply that even if you are a first timer, you are bound to get it right!


The Marbled Madeira Cake she made yesterday looks divine and so easy to make that I just couldn’t stop thinking about it. I jumped out of bed this morning and started baking. The result: an absolutely gratifying soft and aromatic cake that goes very well with a cup of hot tea! Even dear hubby who is not a dessert fan ate what seemed like a quarter of the cake at one go! The only thing I probably have to improve on is probably the marbling effect. Would love to see more swirls on the cake. Well, good enough reason for me to bake this cake again!


If you would like to try this marble cake yourself, here is what you have to do:

1. Preheat the oven to 180C. Grease and line a 20cm springform pan.
2. Beat 225g soft butter till creamy.
3. Add 225g caster sugar and beat till soft and light.
4. In a separate bowl, whisk together 4 eggs and 2 tsp vanila extract.
5. Add the mixture gradually into butter and sugar and mix well.
6. Sift and fold in gently 225g plain flour and 2 tsp baking powder. 
7. Add 50ml milk and stir the mixture gently
8. Take half the batter out.
9. Sift and fold in 50g cocoa powder into one half of the batter.
10. Put a spoonful of vanilla and a spoonful chocolate batter alternately into the greased pan.
11. Using a skewer, swirl cake in any order for marble ripple. Don’t over swirl or you will lose the effect.
12. Pop into the oven for 45 mins or until skewer inserted into the centre of the cake comes out clean.
13. Remove from pan and indulge when cool!

Now next on the list, Rachel Allen’s Lemon Cupcakes!

Sunday, June 27, 2010

Baking project no.1 - Beach-themed cake

TADAAAAH!!!!!


This Mama did bake!!! After many, many, many hours nipping and tucking (including some sacrifice of sleep), this is the result! I thoroughly enjoyed piecing everything together and would definitely do it again! It's not perfect but I'm satisfied with it being my first attempt.

I chose a beach-themed cake for my niece since it was celebrated at Hard Rock Hotel, Batu Feringghi. It is a carrot cake with cream cheese frosting and toasted walnut bits sprinkled on top to make them look like sand on the beach and finally decorated with fondant characters. I got the inspiration for the decoration from this image found online by jsantoso.  There are some amazing decorated cakes there! The bikini girl here is soooooo cute! Mine is no where near even though I made not one but three girls before I called it quits.  My girl has an unproportionally big middle and her face cracked a little from the erm.. lack of moisturiser and too much sun???? ;-P

The little crab is my favourite. It might have been my niece's favourite too as it went straight into her mouth! I also like the little white and red float, sand bucket and rolled up towel. The octopus kinda collapsed on me a bit...

I really like the part where I get to put on the little details such as the bikini ribbon on the girl's back and the embossing on the towel.

I couldn't find black colouring in the shops for the hair and eyes so I had to mix all the colours I have to get a somewhat greyish-black colour.

The carrot cake tasted alright but it was a little on the hard side. Not rock hard but not soft enough. I wonder if it is because I had to bake it earlier and put it in the fridge overnight.

We only had a small party so I didn't mind the height of the cake but would have preferred if it had been double the height. 


The birthday girl blowing out the candles

Tuesday, June 22, 2010

This Mama better get baking!

It's been some time since my last post. There are probably 10 drafts in my folder now and more in my whatever-that's-left-mommy-brain-harddrive. Time management. How do u moms do it? You blog, cook, work, care for 2 (or more) kids... How???

Anyway, I've been even busier with visitors these 2 weeks. My family was in town to keep us company as dear hubby is away on a business trip. His family will then be in town after that till he comes back. So I'll have to take them around a bit while discovering new places and routes (since we have the car to ourselves!), making sure everyone is fed...

At the same time, I discovered Hong Yap Trading Company cake supplies located along Jalan Siam. Have been wanting to bake awhile now with the extra time (yeah, right!) I have in my hands. Thought of starting with either Father's Day or my niece's birthday on the 24th. Got some ideas in mind and then went all gung-ho and bought RM100+ worth of goodies! The main bulk of the cost is from the ready made 2.5kg fondant which costs about RM40. Hmm... time to learn how to do it myself??

Ok, less talk more work now. Let's see if I can whip up something decent enough for us to eat in a few days' time!
Related Posts with Thumbnails